
How to Shade Bubble Letters: Easy Guide for Beginners
Are you looking to add depth and dimension to your artistic projects? Learning how to shade bubble letters is a game-changer, transforming simple outlines into popping, 3D text that leaps off the page. Whether you’re a budding artist, a DIY enthusiast, or a seasoned designer, mastering the art of shading can elevate your work from flat to fabulous. In this guide, we’ll explore the techniques and tips to give your bubble letters a life-like quality that can enhance posters, logos, and personal artwork. Get ready to dive into the world of shading and bring your bubble letters to life with skills that will impress and express!
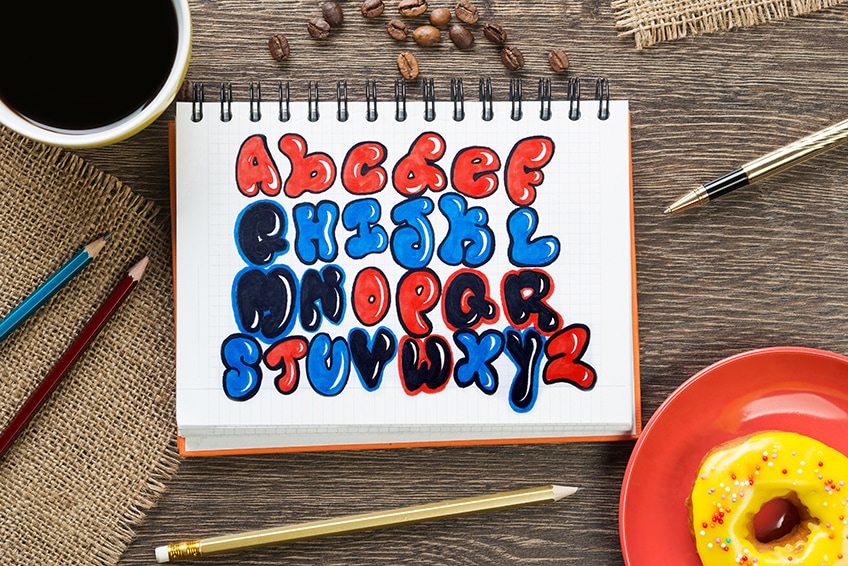
To shade bubble letters, beginners can follow an easy guide comprising simple techniques and tips.
Choosing The Right Materials
When it comes to shading bubble letters, choosing the right materials is key to achieving the desired effect. The right tools and paper can make all the difference in creating shading that adds depth and dimension to your lettering. In this guide, we will explore different shading tools and discuss the importance of selecting appropriate paper for shading bubble letters.
Exploring Different Shading Tools
When it comes to shading bubble letters, having the right tools can greatly enhance your shading techniques. Here are some popular shading tools that you can consider:
- Soft graphite pencils: These are versatile tools that allow you to easily control the darkness of your shading. They come in various degrees of softness, providing different levels of shading.
- Charcoal sticks: Charcoal sticks are great for achieving a bold and smoky effect. They are perfect for creating a dramatic shading effect on bubble letters.
- Blending stumps: Blending stumps are useful for blending and smoothing out shading. They are particularly effective in creating seamless transitions between light and dark areas.
- Shading brushes: Shading brushes are ideal for creating smooth gradients and soft shading. They can be used with different mediums like ink or watercolor to achieve unique shading effects.
Selecting The Appropriate Paper For Shading Bubble Letters
Choosing the right paper is crucial for achieving optimal shading results. Here are some factors to consider when selecting paper for shading bubble letters:
- Texture: Opt for a paper with a slightly rough texture as it helps in holding the shading material and adds more depth to your shading. Smooth papers can make shading more difficult as the materials may slide off.
- Weight: Thicker and heavier-weight papers are ideal for shading bubble letters as they can withstand the application of pressure without tearing or wrinkling.
- Quality: Choose acid-free and archival-quality papers to ensure your shading remains vibrant and doesn’t fade over time. These papers are also more durable and less prone to yellowing.
- Color: Consider using colored papers to add an extra dimension to your shading. Experimenting with different paper colors can result in unique shading effects.
By exploring different shading tools and selecting the appropriate paper, you can take your bubble letter shading to the next level. Remember to experiment and practice to find the combination that works best for you. Now that we’ve covered the materials, it’s time to dive into the actual shading techniques in our upcoming blog posts.
Understanding Light And Shadow
When it comes to shading bubble letters, understanding light and shadow is essential. Light and shadow play a crucial role in creating depth and dimension. By understanding how light interacts with objects, you can effectively shade your bubble letters to make them appear more realistic. In this guide, we will explore the concept of light source in shading and identify the areas of light and shadow in bubble letters.
Concept Of Light Source In Shading
Before you begin shading your bubble letters, it is important to understand the concept of light source. The light source is the direction from which light falls onto your letters. It determines the positioning of the areas of light and shadow. To determine the light source, imagine a virtual light bulb or the sun shining on your letters. This will help you visualize which parts should be lighter and which should be darker.
For example, if the light source is coming from the top left corner, the top left sides of the letters will be lighter, while the bottom right sides will be darker. Keeping the light source consistent throughout your shading will give your bubble letters a more cohesive and realistic appearance.
Identifying The Areas Of Light And Shadow In Bubble Letters
Once you have determined the light source, you can start identifying the areas of light and shadow in your bubble letters.
- Light Areas:
The areas of the letters that directly face the light source will be the lightest. These areas will have the least amount of shading and will appear brighter. Use a lighter color or leave these areas white to create the impression of light hitting the letters.
- Shadow Areas:
The areas of the letters that are opposite to the light source will be the darkest. These areas will have the most shading and will appear darker. Use a darker color or add more shading to these areas to create depth and contrast.
Keep in mind that the edges of the letters can also create shadows. Pay attention to the curves and bends of each letter and add shading accordingly to create a more realistic three-dimensional effect.
By understanding light and shadow and identifying the areas of light and shadow in your bubble letters, you can effectively shade them to create depth and dimension. Experiment with different light sources and shading techniques to bring your bubble letters to life with realism.
Basic Shading Techniques
Discover the perfect shading techniques to bring your bubble letters to life. This easy guide is designed for beginners to create stunning effects with ease.
Shading can take your bubble letters from flat and two-dimensional to dynamic and eye-catching. It adds depth and dimension, making your letters come alive on the page. In this guide, we will explore two basic shading techniques: hatching and cross-hatching. These techniques are perfect for beginners and will help you master the art of shading bubble letters.
Utilizing The Hatching Technique For Shading Bubble Letters
The hatching technique involves creating parallel lines to add shading and depth to your bubble letters. You can use this technique to create various effects, depending on the angle and spacing of your lines.
To shade your bubble letters using the hatching technique, follow these steps:
- Create a light sketch of your bubble letters using a pencil.
- Identify the direction from which the light is coming. This will determine where to place your shadows.
- Begin by drawing parallel lines in the areas that are furthest from the light source. These lines should be spaced evenly and follow the contour of your bubble letters.
- Gradually increase the darkness of the lines as you move towards the areas that receive less light.
- Continue adding parallel lines until you achieve the desired shading effect.
Using the hatching technique, you can create shading that gives your bubble letters depth and dimension.
Exploring The Cross-hatching Method For More Depth And Texture
If you want to add even more depth and texture to your bubble letters, you can try the cross-hatching method. This technique involves layering multiple sets of parallel lines at different angles.
Follow these steps to shade your bubble letters using the cross-hatching method:
- Create a light sketch of your bubble letters using a pencil.
- Identify the direction from which the light is coming.
- Start by drawing parallel lines in one direction, following the contour of your bubble letters.
- Next, draw another set of parallel lines in a different direction, intersecting the first set of lines.
- Continue adding sets of parallel lines at different angles until you achieve the desired shading effect.
The cross-hatching method adds complexity to your shading, creating a textured and realistic look for your bubble letters.
Creating Depth And Dimension
Learn the easy techniques to shade bubble letters and create depth and dimension in your artwork. Perfect for beginners, this step-by-step guide will help you master the art of shading and take your lettering to the next level.
Creating Depth and Dimension
When it comes to shading bubble letters, adding depth and dimension is the key to making them truly pop off the page. This gives your letters a three-dimensional appearance, making them look more realistic and visually appealing. In this guide, we will explore two techniques that can help you achieve this effect: employing the blending technique and using the gradient technique.
Employing the blending technique to add depth to bubble letters
The blending technique is an excellent way to add depth to your bubble letters. It involves using different shades of the same color to create a smooth transition from light to dark. This gives the illusion of shadow and highlights, making your letters look more dimensional. To employ this technique effectively, follow these steps:
1. Start by choosing your base color. This will be the color of your bubble letters.
2. Select a slightly darker shade of your base color. This will be used for shading.
3. Using a soft brush, apply the darker shade along the edges and curves of your letters. Start with a light touch and gradually build up the intensity of the shade.
4. To create highlights, choose a lighter shade of your base color. Apply this lighter shade to the areas that would be hit by light, such as the tops of the letters or any rounded surfaces.
5. Blend the shades together using a blending brush or a soft cloth. This step is crucial for creating a smooth transition between the shades and achieving a realistic look.
Using the gradient technique to give bubble letters a three-dimensional appearance
The gradient technique is another effective way to add depth and dimension to your bubble letters. It involves creating a gradient that goes from light to dark or from one color to another. This gives the illusion of depth and can make your letters appear like they are popping off the page. To use the gradient technique, follow these steps:
1. Select two or more colors that complement each other. These will be the colors for your gradient.
2. Start by applying the lighter color to the tops of your letters or any rounded surfaces. This is where the light would naturally hit, creating highlights.
3. Gradually transition to the darker color as you move towards the curved edges and bottoms of your letters. This will create the illusion of shadows.
4. Blend the colors together using a blending brush or by gently overlapping them with a soft cloth. This will ensure a smooth transition between the colors and enhance the three-dimensional effect.
By employing the blending technique and using the gradient technique, you can easily add depth and dimension to your bubble letters. These techniques will take your lettering skills to the next level, making your creations more visually striking and eye-catching. Experiment with different color combinations and shading styles to find your unique style and create bubble letters with a three-dimensional appeal.
Employing The Blending Technique To Add Depth To Bubble Letters
The blending technique is an excellent way to add depth to your bubble letters. It involves using different shades of the same color to create a smooth transition from light to dark. This gives the illusion of shadow and highlights, making your letters look more dimensional. To employ this technique effectively, follow these steps:
- Start by choosing your base color. This will be the color of your bubble letters.
- Select a slightly darker shade of your base color. This will be used for shading.
- Using a soft brush, apply the darker shade along the edges and curves of your letters. Start with a light touch and gradually build up the intensity of the shade.
- To create highlights, choose a lighter shade of your base color. Apply this lighter shade to the areas that would be hit by light, such as the tops of the letters or any rounded surfaces.
- Blend the shades together using a blending brush or a soft cloth. This step is crucial for creating a smooth transition between the shades and achieving a realistic look.
Using The Gradient Technique To Give Bubble Letters A Three-dimensional Appearance
The gradient technique is another effective way to add depth and dimension to your bubble letters. It involves creating a gradient that goes from light to dark or from one color to another. This gives the illusion of depth and can make your letters appear like they are popping off the page. To use the gradient technique, follow these steps:
- Select two or more colors that complement each other. These will be the colors for your gradient.
- Start by applying the lighter color to the tops of your letters or any rounded surfaces. This is where the light would naturally hit, creating highlights.
- Gradually transition to the darker color as you move towards the curved edges and bottoms of your letters. This will create the illusion of shadows.
- Blend the colors together using a blending brush or by gently overlapping them with a soft cloth. This will ensure a smooth transition between the colors and enhance the three-dimensional effect.
By employing the blending technique and using the gradient technique, you can easily add depth and dimension to your bubble letters. These techniques will take your lettering skills to the next level, making your creations more visually striking and eye-catching. Experiment with different color combinations and shading styles to find your unique style and create bubble letters with a three-dimensional appeal.
Adding Details And Highlights
Once you have mastered the basics of shading bubble letters, it’s time to take them to the next level by adding details and highlights. This step allows you to bring your letters to life and make them truly eye-catching. In this section, we will explore two techniques that can enhance your bubble letters: adding highlights and reflections, and incorporating texture and patterns.
Enhancing Bubble Letters With Highlights And Reflections
Highlights and reflections can add depth to your bubble letters, making them appear three-dimensional. To achieve this effect, follow these steps:
- Choose your light source: Before adding highlights and reflections, determine the direction of the light source in your artwork. This will help you know where to place the highlights and the areas that should appear darker.
- Add highlights: Use a lighter shade of the color you are using for the letters to create highlights. Apply this lighter color to the portions of the letters that would be hit by the light source. Typically, the top and sides facing the light should have highlights.
- Create reflections: To make your bubble letters look glossy, add reflections. Use a bright white color and apply it to the portions of your letters that are directly facing the light source. This will give the impression of light bouncing off the surface.
- Blend and smudge: To make the highlights and reflections appear more realistic, softly blend and smudge the colors using a blending tool or your fingertip. This will create a smooth transition between the base color, highlights, and reflections.
Incorporating Texture And Patterns To Bring Bubble Letters To Life
Texture and patterns can add visual interest and uniqueness to your bubble letters. Here are some ways to incorporate texture and patterns:
- Wood grain texture: Use short, vertical strokes to create a wood grain effect. Vary the shades of brown to mimic the natural patterns found in wood.
- Stone texture: Use small, irregular shapes and varying shades of gray to simulate the look of stones. Add highlights and shadows to enhance depth.
- Geometric patterns: Experiment with geometric patterns like stripes, chevron, or polka dots to add a modern and dynamic element to your bubble letters. Use contrasting colors for a more striking effect.
- Floral patterns: Incorporate delicate floral patterns within the letters to create a whimsical and feminine look. Use pastel hues for a soft and dreamy effect.
By adding highlights and reflections and incorporating textures and patterns, you can take your bubble letters to new artistic heights. These techniques will help your letters stand out and grab attention, whether you’re using them for a personal project or a professional design.
Credit: artincontext.org
Frequently Asked Questions On How To Shade Bubble Letters : Easy Guide For Beginners
How To Do Bubble Writing Easy?
Bubble writing can be easily done by following these steps: 1. Start by sketching out the outline of your letter or word. 2. Fill in the outline with a thick marker or pen to create the bubble effect. 3. Add shadows and highlights to make the writing appear three-dimensional.
4. Experiment with different colors and styles to personalize your bubble writing. 5. Practice regularly to improve your skills. Happy bubble writing!
How Do You Make Bubble Letters Look Cool?
To make bubble letters look cool, try these tips: Choose a fun font style, add shadows or gradients for depth, use vibrant colors, add embellishments like stars or hearts, and experiment with different outlines or borders for a stylish effect.
How To Do Aa In Bubble Letters?
To create bubble letters, start by sketching the outline of your letter using a pencil. Then, carefully fill in the outline, making the edges appear rounded and puffy. Finally, add shading to create a three-dimensional effect. Remember, practice makes perfect!
How Do You Start A Bubble Letter?
To start a bubble letter, begin by sketching your desired letter shape with clean lines and rounded edges. Use a pencil to outline the letter, then go over it with a marker to make it bold and defined. Add shadows or highlights for a 3D effect, and color it in if desired.
Practice and experiment to develop your own unique bubble letter style!
Conclusion
Mastering the art of shading bubble letters may seem daunting at first, but with this easy guide, beginners can create stunning designs effortlessly. By following the step-by-step instructions, you’ll learn the techniques needed to add depth and dimension to your lettering.
Whether you’re a budding artist or just looking to explore a new hobby, this tutorial provides a solid foundation for your shading journey. Let your creativity flow and watch your bubble letters come to life!


